Wednesday, March 13, 2013

One for Mom and One for Kid

Today I tackled a project for myself and one for Corin. While mine was purely cosmetic and helped organize some clutter, his was educational. As long as one of us is learning something, right?

You see my cute little palm tree that I did here sitting all alone on the printer? Today I took care of that and hung a floating shelf I found at Target on sale!! WHOOT!! Here's what can be done in a measly 15 minutes...with the right tools, no children under foot, and level walls...can you guess which one I had?


First you find the spot where you want to put it and level the clip. This particular floating shelf, by Home Accents by Target, comes with a french clip which means there are two pieces that fit together. Once you have it level mark your holes...


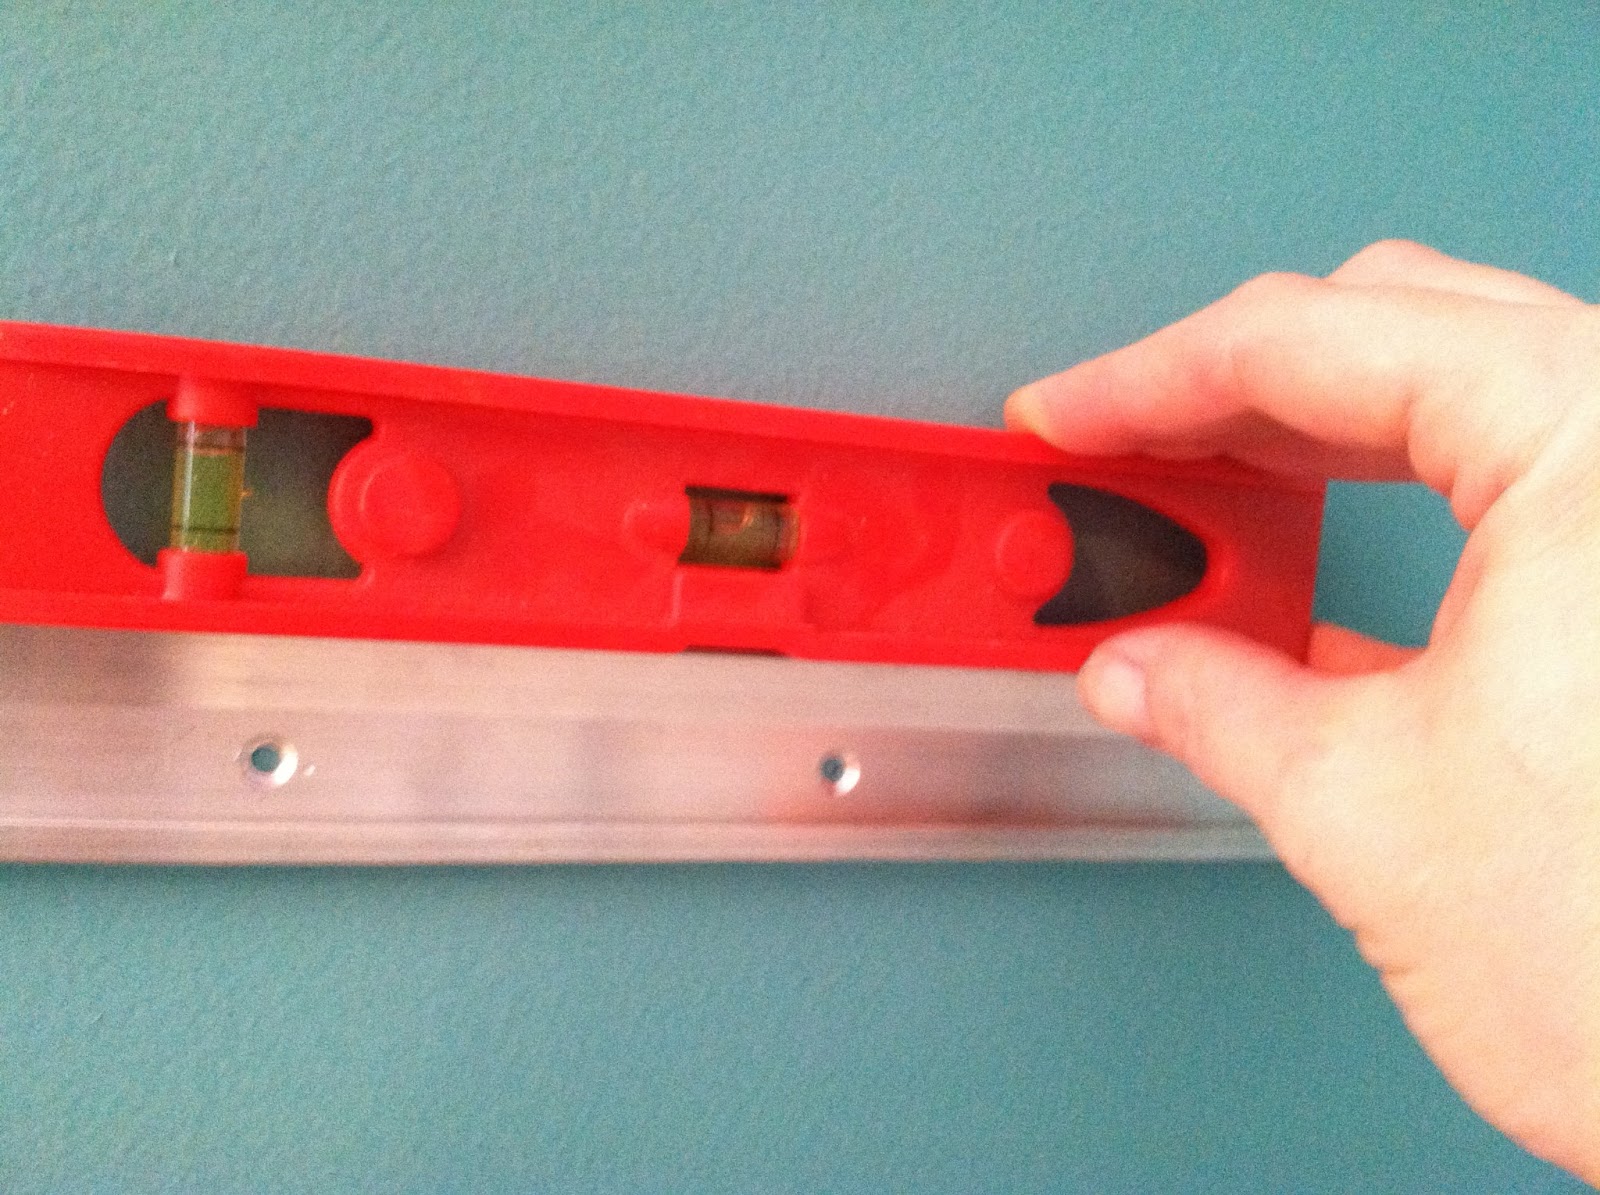
 If you guessed that I had power tools you were right!!The kit comes with drywall anchors that just screw in the wall, unfortunately I couldn't use those.  I had to drill pilot holes, because I have original sheet rock in my house which may actually be rock. You probably want to try to get at least one hole lined up with a stud, just for support reasons.


 VIOLA! A floating shelf for my palm tree...


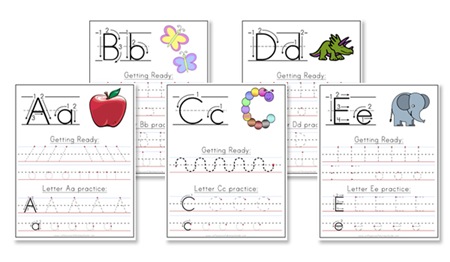
The next project of the day was for Corin, and a sneaky form of education. I was cruising around Pinterest a couple days ago and came across this gem on a blog called That's So Cuegly. It's a dry erase marker handwriting binder. We just had parent/teacher conference and apparently Turbo Boy is lagging behind in the "letters in my name" department so it was a perfect idea!


So I ran to the store and grabbed a $1 binder and a package of cover sheets. Then I went online to this home schooling website called Confessions of a Homeschooler. She has all sorts of free print outs and I liked these the best...


Once I had everything together it was easy enough to put it all together...


Even with a three year old...


 26 painstaking pages later we had a binder of hand writing worksheets...


But Corin loved it and we had fun!! Just grab a dry erase marker and a napkin and you're good to go. I think I'm going to make an eraser out of felt and maybe get a little pencil case to hold everything??


I also added three pages of blank lines so we could practice writing his name...

He can trace like a pro!

Done and Done...Mom duties of the day are done, now to heat up a frozen pizza, watch cartoons until bedtime, and turn the dryer back on because I never got around to folding my morning load of laundry.


Tuesday, March 12, 2013

Valance Update

While making Corin's bed yesterday I glanced up and decided if we were going to go the "Big Boy Room" route then there was some more updating that was needed. Especially in the form of a new valance to replace this one...


The animal valance came with the crib set we got three years ago and while it's cute, cartoon giraffes and monkeys don't really go with dinosaurs and hot wheel tracks. I decided an update was needed and I just so happened to have this blue pinstripe curtains.


I have 4 panels, the other two will probably go on his window?? In the mean time I used two of the panels for this update. First I laid them out on the floor and placed the old valance on top.


Then I marked the curtain I was cutting 3 inches below the old one. I wanted this new valance to hang lower then the old one to hide the shelves in the top of the closet.


Next I cut along the line I made and laid it on top of the second panel and cut that one to length.


After everything was cut to length I lined up the edge I was sewing together and pinned it.


 After they were joined together I rolled up the hem and sewed it. I like to fold it up and iron it flat, I find that it's easier to keep a straight seam that way.


When it was done I just replaced the old one using the same curtain rod...


...Much better!!


On a side note you can also do this project without a sewing machine or thread for that matter. There is this awesome tape called stitch witchery, or something like that, you just place it inside the seam and iron it. When the tape gets hot it melts and binds everything together. I like it, but I have just as easy a time with my machine. I'm planning on making some faux roman shades for the kitchen sometime in the near future and I'll probably use the iron tape for that, so stay tuned!


Monday, March 11, 2013

Bye Bye Baby

A few weeks ago I participated in a Winter Pinterest Challenge  I had big plans to paint and put together Corin's new big boy bed that I found at a local reused furniture store.


However, due to unfriendly painting weather I couldn't get it done. Not to be discouraged I pulled up my sleeves and did a quick craft for the kitchen...


I am happy to announce now that this past weekend the Sun shined down on Columbus and I finally got to work on the bed! I'm not feeling the writing thing today, so I'm going to make this short and sweet...


The bed had a brown stain with a black wash over it and while it was ok I didn't love it. So I chose a Navy Blue in satin spray paint by Valspar. It's awesome, because it has a built in primer and really does a nice job. I also gave a bed a once over with these finishing pads. It's like sand paper but it's flexible, like scotch guard greens scrubbers for dishes. They are awesome for projects, like this one, because you can sand something that isn't a flat surface (spindles especially).


See how nicely it fits between the spindles? It was really quick and easy to do the rounded parts and the creases...It took me maybe an hour to do the headboard, foot board, and two runners. The sanding pad was totally gross by the time it was done, YUCK!


When everything was sanded I wiped it down with a damp rag and put it together...


I then taped around the edge of the runner board on each side so that I wouldn't get a build up of paint and potentially paint them together. I also put a drop cloth down to protect the driveway. 


Then it was just a matter of painting everything. I did two light coats and then went back and touched up some areas where the brown was showing through. I didn't do a top coast because I want the brown to show through as it wears over the years.


 Once it was done I let if dry for 24 hours and then moved it into the house and the crib out. It was a little sad to see Corin's crib leave, but it was for the best...


 because he loves it...


Monday, March 4, 2013

Bring the Beach Home

So I know that I've been a little MIA this past week, since the first kitchen renovation post, but I started my new job! I got hired on at this historical Bed and Breakfast that is kind of a secret gem in our city of Columbus. It's called The Inn at Irwin Gardens and is over 100 years old. I'm not going to go into the history about it just now, but check out the website and enjoy this eye candy...


So I was planning on having the second part to the kitchen renovation, but I can NOT find the pictures of us sanding floors or building cabinets! I'm pretty sure we took a couple, we were working our buns off to have it done in a month, so I'll keep looking. I may have to skip ahead to the tiling and come back to the other things once I find them. Anyway!! I did do this little craft this morning that I thought I'd share...

I found this Curly Ponytail Palm Tree this morning at Lowe's on the 75% shelf with a bunch of other sad looking plants. I am assuming that they don't get watered the correct way? I mean they just walk around and soak all of them...orchids and all. Anyway, I rescued picked up this cutie for $3.


 It had this ugly tan glued together pea gravel that was missing most of it, so it had to go...


 Next I grabbed an old sample of Valspar Cool Pool in satin and a paint brush. The pot was glazed, so ideally you'd prime it, but I didn't feel like spending the extra time. Valspar makes a pretty good paint that sticks to anything, because of it's built in primer I guess.


 Once the paint was on I let it dry while I filled it up with some glass pebbles I had lying around...


Then I topped off the glass with shells, coral, and sea glass that I picked up off the beach in Key West with my family last May...


Looks GREAT with the beach painting...